Authentic Japanese Teriyaki Chicken (Tori no Teriyaki)
Japanese teriyaki chicken is not the brown sauce in the bottle on your grocery store shelf. The word "teriyaki" translates to "gloss-grilled" in English. After three months researching Japanese-language sources, I kept coming back to the etymology as the simplest way to explain why the American version is so different. None of it is actually glossy. This recipe is the version Japanese home cooks make.
If you've made teriyaki at home and your sauce wouldn't thicken without cornstarch, the missing ingredient is real mirin. Most American grocery stores don't carry it. There are three things in America labeled "mirin" and only one of them is actually mirin.
This post contains affiliate links, which means I may earn a small commission if you make a purchase. It doesn't cost you anything extra. Full disclosure.
Why This Japanese Teriyaki Chicken Recipe Works
- The 2:2:2:1 golden ratio (Ogonhi). Four ingredients: soy sauce, sake, mirin, white sugar. No garlic, no ginger, no cornstarch. This is the consensus across NHK, Kikkoman Japan, Sirogohan, and a stack of other Japanese-language authorities.
- Real hon-mirin, not aji-mirin. Three things in America are sold as "mirin" and only one of them actually is mirin. Eden Foods is the easiest real one to find. You can find it at Whole Foods or on Amazon.
- Cold-pan, skin-down start. The fat renders gradually instead of seizing under the skin. You get crisp skin without the rubbery underside that hot-pan starts produce.
- The fat wipe. A water-based tare slides off a greasy pan. Wiping the rendered fat out is the step every Japanese source insists on and every American recipe leaves out.
- Layered basting through the bubble stages. Fine bubbles first, then larger bubbles, then the sauce reduces down to a glossy layer on the skin. Each spoonful that hits the hot skin caramelizes onto the previous layer. This basting-and-reducing technique is the part of the dish that "teriyaki" actually names.
Ingredients You'll Need
The tare is just four ingredients. The whole recipe is short. Most of the substitution decisions come down to the mirin.
Hon-mirin (the most important call). There are three products sold as "mirin" in America. Real hon-mirin is fermented from glutinous rice, rice koji, and shochu. ABV around 14 percent. The other two are corn syrup with rice flavoring and have under 1 percent alcohol or none at all. The English label often says "Sweet Cooking Rice Seasoning," which is the regulatory tell. What to buy: Eden Foods Mirin (~$12 at Whole Foods or online). It's the closest mainstream-available option to true hon-mirin. Avoid Kikkoman Manjo Aji-Mirin and Kikkoman Kotteri Mirin. Both Kikkoman products. Neither is actually mirin.
Sake. A cheap bottle of Gekkeikan or Sho Chiku Bai from the liquor aisle is what you want. The product labeled "cooking sake" (ryorishu) has added salt so it can be sold as a seasoning instead of as alcohol, which throws off the tare and is usually more expensive than the real stuff anyway.
Soy sauce. Kikkoman regular, naturally brewed. The standard Japanese koikuchi (dark soy sauce) and the universal default. Yamasa is a step up if you want it. Skip anything labeled with "hydrolyzed soy protein."
Sugar. Plain white granulated sugar. Brown sugar's molasses changes the flavor of the tare and honey caramelizes differently. The Japanese version has a clean, neutral sweetness on purpose.
Chicken. Bone-in, skin-on thighs. The skin renders the fat that makes the cold-pan technique work, and the kitsune-iro color on the seared skin is half the visual payoff. Boneless skin-on is preferred if you can find it, but most US grocery stores don't carry it (deboning instructions are in the steps below). Boneless skinless won't get you crisp skin or the same glaze, so the cut isn't really negotiable.
How to Make Authentic Japanese Teriyaki Chicken
- Mix the tare. Whisk soy sauce, sake, mirin, and sugar in a small bowl until the sugar dissolves. Set it aside.
- Debone the thighs (if using bone-in). Place each thigh skin-down. Cut down the center to expose the bone. Cut along both sides, keeping the blade against the bone so you don't waste meat. Slide the knife under to free the bone. Save the bones; you'll use them for banno-dare at the end.
- Trim and score. Trim any yellow fat and excess skin that hangs off the edges. Flip skin-side up and score the skin all over with the tip of the knife. The cuts let the fat render out and keep the skin from curling in the pan.
- Bring the chicken to room temperature. Pat the thighs dry on both sides with paper towels and let them sit out for 20 to 30 minutes. Cold-from-the-fridge chicken cooks unevenly. The outside overcooks before the center comes up to temperature.
- Start in a cold pan, skin-down. Place the thighs skin-down in a cold stainless or carbon steel skillet. Now turn the heat to medium. For the first minute or two, press the chicken flat with a spatula to keep the skin in full contact with the pan. The cold-pan start lets the skin render its fat slowly. A hot-pan start contracts the skin around its own fat, and you end up with skin that's brown on top and rubbery underneath.
- Render and sear, 7 to 8 minutes skin-down. Don't move the chicken. Periodically blot the rendered fat that pools in the pan with a folded paper towel. You're looking for kitsune-iro ("fox color"), a deep golden brown. The color creep should crawl about 5mm up the side of each thigh.
- Flip to the flesh side, 4 to 6 minutes. Cook another 4 to 6 minutes flesh-side down. The chicken should be about 80 percent cooked at this point. Slightly pink in the center is fine because we're going to finish it in the tare. Remove the chicken to a plate.
- Wipe the pan completely. Use a wad of paper towels to wipe out all the rendered fat, browned bits, and residue. The surface needs to be clean and dry. This is the step most American recipes skip and it's the difference between a glaze that adheres and a sauce that slides off.
- Pour in the tare. Return the pan to medium-high heat. Pour the tare into the center of the clean pan. It will bubble immediately as the soy sauce hits the hot metal.
- Return the chicken, skin-side up. Place the thighs back in the pan with the skin facing up. The skin stays out of the sauce so it keeps its crisp.
- Baste through the bubble stages. Spoon the tare over the skin repeatedly. The bubbles tell you the reduction stage:
- Fine, small bubbles: sauce is boiling but thin. Keep basting and don't rush.
- Bigger bubbles: sauce is thickening. Pick up the basting pace.
- Large 2 to 3 cm bubbles: real body now.
- Sauce visibly diminishing, coating like lacquer: drop the heat to low. The tare should cling in a thin reflective layer when you tilt the pan. This is the teri.
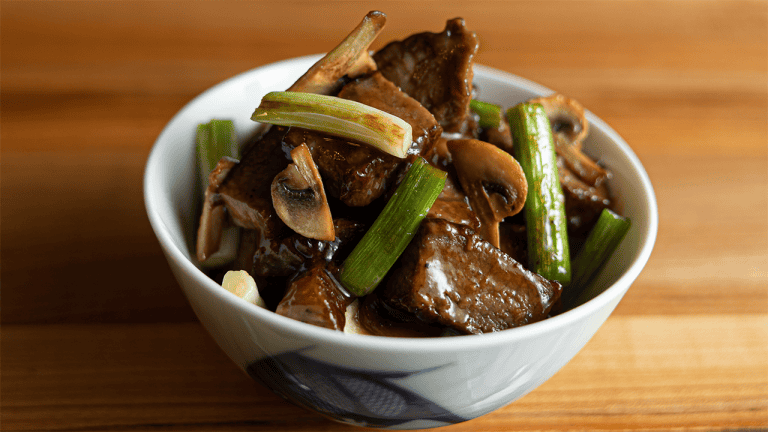
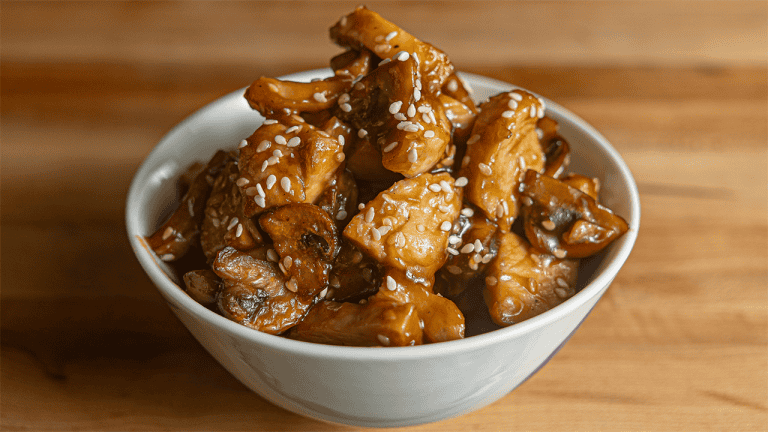
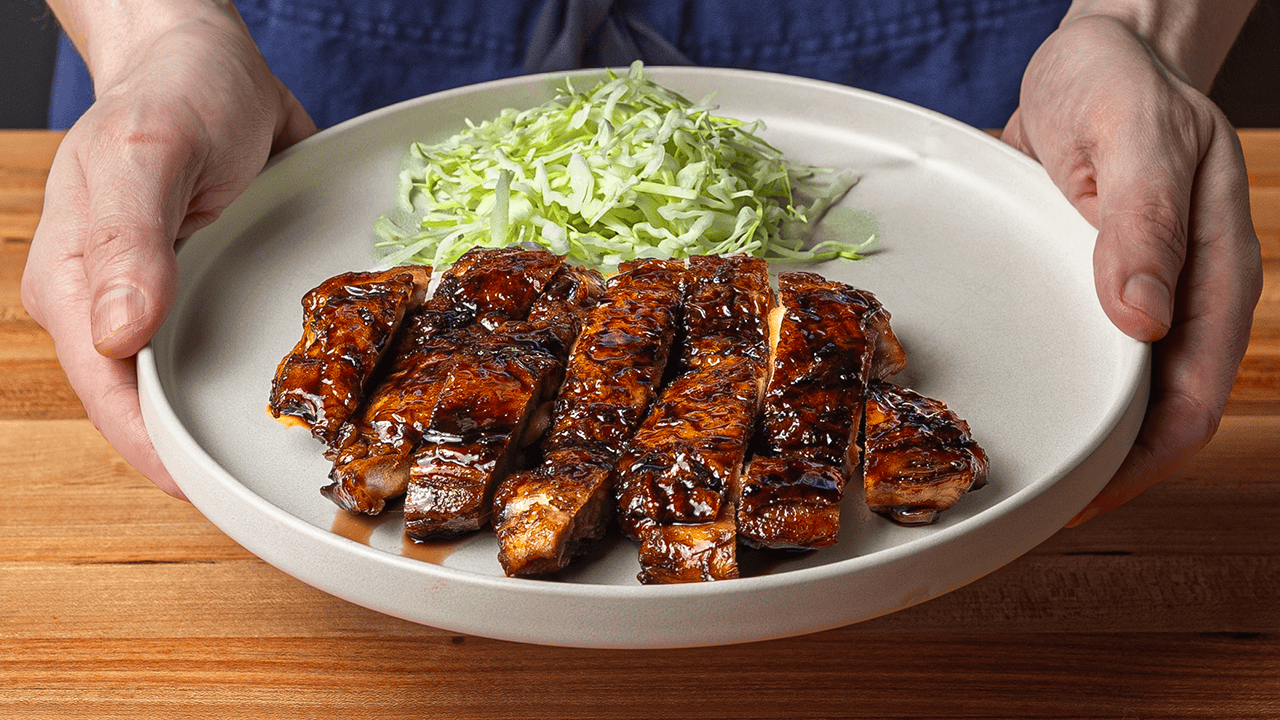
- Rest, slice, and serve. Move the chicken to a cutting board and rest it for 5 minutes. Slice each thigh on the bias into half-inch pieces. Spoon any remaining tare from the pan over the sliced chicken.
Tips for the Best Japanese Teriyaki Chicken
- The fat wipe is non-negotiable. The tare is water-based, so rendered fat in the pan just repels it. The sauce ends up pooling instead of coating the chicken.
- Don't push the reduction past lacquer. The sugars burn quickly at that point and the whole sauce goes bitter. If the sauce starts smelling acrid or smoking, kill the heat and pull the chicken.
- Match your pan size to the chicken. Too big a pan and the tare spreads thin and scorches before it reduces. Two thighs in a 12-inch skillet is about right.
- Save the bones. Roast them under the broiler and simmer in a fresh batch of golden-ratio tare to make banno-dare, the all-purpose Japanese sauce home cooks keep in the fridge year-round. Recipe in the section below.
Bonus: Banno-Dare (All-Purpose Bone Sauce)
The Japanese name banno-dare translates to "all-purpose sauce." Home cooks in Japan keep a jar of this in the fridge year-round and use it on rice, in noodles, as a dipping sauce, as a marinade, or reduced down into a glaze for other proteins. The version that uses the bones from this recipe is one of the easiest entry points to making it.
How to make it:
- Char the saved bones under the broiler until they're caramelized and the edges start to blacken in spots.
- Mix up a bigger batch of the golden-ratio tare: 2 parts soy sauce, 2 parts sake, 2 parts mirin, 1 part white sugar. Total volume is up to you.
- Drop the charred bones into the tare and simmer gently for 45 minutes to 1.5 hours. The cartilage releases gelatin, which gives the sauce body. The caramelized exterior of the bones infuses flavor into the liquid.
- Reduce until the sauce coats the back of a spoon, then strain out the solids.
The finished sauce keeps in the fridge for about 2 weeks, or in the freezer for 1 to 2 months. Bring it to a brief boil for a few seconds before each use as a food-safety precaution.
What to Serve With Japanese Teriyaki Chicken
The classic Japanese plate is teriyaki chicken over short-grain rice with finely shredded cabbage soaked in ice water for 10 minutes (drained and patted dry). The chicken with the glaze is intensely sweet and rich, so the cold raw cabbage gives you something fresh and plain to eat alongside it. There's no dipping sauce. The chicken comes out of the pan already coated.
If you want a side or two on the plate, my fried rice recipe and egg drop soup are both quick complements. They aren't strictly Japanese, but they pair well enough that nobody at the dinner table will care.
Storage and Reheating
Cooked teriyaki chicken keeps in the fridge for 3 to 4 days. The high salt and sugar from the soy sauce and mirin act as mild preservatives, which is part of why this dish is the classic Japanese bento staple. It holds up well at room temperature and even tastes good cold straight out of the fridge.
To reheat: toss in a covered skillet over medium heat with a splash of water for 2 to 3 minutes, just until warmed through. The microwave works too but it'll dull the lacquer surface on the skin.
The leftover tare in the pan can be poured over rice, used as a quick glaze for tofu or vegetables, or saved to mix into your next batch of banno-dare.
Frequently Asked Questions
What's the difference between Japanese and American teriyaki?
The Japanese version is a four-ingredient sauce (soy sauce, sake, mirin, sugar) reduced onto the chicken in layers using a basting technique. American teriyaki is usually a thicker brown sauce with garlic, ginger, and cornstarch that gets dumped over the chicken at the end. The word "teriyaki" literally means "gloss-grilled" in Japanese, and the layered glaze is the gloss. Most American versions don't have any.
Can I substitute aji-mirin for hon-mirin?
You can, but the result will be different. Aji-mirin (the Kikkoman product labeled "Sweet Cooking Rice Seasoning") is mostly corn syrup with a small amount of alcohol added. Real hon-mirin contains complex sugars (fructose, glucose, maltose) that caramelize at different temperatures, which is what creates the layered glaze when you baste. Aji-mirin caramelizes uniformly and won't reduce into the same lacquer surface. If you can't find hon-mirin, your sauce won't thicken the same way and you'll probably want to add a small cornstarch slurry to compensate.
Why is there no garlic or ginger in this recipe?
Traditional Japanese teriyaki tare has no aromatics. Multiple Japanese-language sources I checked confirm this independently, including Just One Cookbook, Sirogohan, and Kyodokan. The clean four-ingredient sauce is what allows the staggered caramelization and Maillard reaction to come through clearly. Adding garlic and ginger is an American adaptation. It's not wrong (Morimoto adds them in his cookbook), but it changes the dish.
Can I use boneless skinless chicken breasts?
Not really. The skin is doing real work in this recipe. It renders the fat the cold-pan technique needs, and the kitsune-iro color and texture on the skin is half the visual payoff. You can technically make the tare and sear breast meat in it, but you won't get the lacquer effect because there's no skin for the glaze to layer onto. If you only have breast on hand, treat it more like a stir-fry application of the sauce; it's a different dish.
More Japanese Recipes
More Benihana Recipes
- Benihana Fried Rice
- Benihana Garlic Butter
- Benihana Hibachi Onion Soup
- Benihana Yakisoba
- Benihana Teriyaki Sauce
- Benihana Teriyaki Chicken
- Benihana Teriyaki Steak
- Benihana Spicy Teriyaki
- Hibachi Chicken
- Hibachi Steak
- Hibachi Shrimp
- Hibachi Vegetables
- Benihana Yum Yum Sauce
- Benihana Spicy Sauce
- Benihana Diablo Sauce
- Benihana Ginger Salad Dressing
- Benihana Mustard Dipping Sauce
- Benihana Ginger Dipping Sauce
- Banana Tempura
- Every Benihana Recipe (Complete Guide)
More Teriyaki Recipes
Recipe
Authentic Japanese Teriyaki Chicken
Equipment
- 1 Made-In 12-inch Steel Frying Pan Stainless or carbon steel; do not use nonstick
- 1 Whisk
- 1 Misono Chef's Knife For deboning the thighs and slicing on the bias
- 1 Silicone Spatula For pressing the chicken flat in the cold-pan stage
- 1 Gray Kunz Chef's Spoon Large For basting the tare over the skin
Ingredients
The Tare (Golden Ratio)
- ¼ cup Japanese soy sauce Kikkoman, naturally brewed
- ¼ cup drinking sake Gekkeikan or Sho Chiku Bai (drinking sake, not the salted "cooking sake" / ryorishu)
- ¼ cup hon mirin Eden Foods or other hon-mirin (avoid Kikkoman Aji-Mirin)
- 2 tablespoon white sugar
The Chicken
- 2 pieces bone-in skin-on chicken thighs bone-in skin-on chicken thighs → about 1 lb / 450g total
For Serving
- 2 cups Japanese short-grain rice cooked
- ¼ head green cabbage green cabbage → finely shredded, soaked in ice water 10 min, drained and patted dry
Instructions
Make the Tare
- Whisk soy sauce, sake, mirin, and sugar in a small bowl until the sugar dissolves. Set aside.
Prep the Chicken
- Place each thigh skin-down on a cutting board. Cut down the center to expose the bone. Cut along both sides of the bone, keeping the blade against the bone so you don't waste meat. Slide the knife under to free the bone. Save the bones for banno-dare.
- Trim any yellow fat and excess skin that hangs off the edges. Flip skin-side up and score the skin all over with the tip of the knife. The cuts let fat render and keep the skin from curling.
- Pat the thighs dry with paper towels on both sides. Let them sit at room temperature for 20 to 30 minutes before cooking.
The Skin Sear
- Place the thighs skin-down in a cold stainless or carbon steel skillet. Turn the heat to medium. For the first 1 to 2 minutes, press the chicken flat with a spatula to keep the skin in full contact with the pan.
- Cook skin-down for 7 to 8 minutes without moving the chicken. Periodically blot the rendered fat that pools in the pan with a folded paper towel. You're looking for kitsune-iro ("fox color"), a deep golden brown.
- Flip to the flesh side and cook another 4 to 6 minutes. The chicken should be about 80 percent cooked at this point. Remove to a plate, skin-side up.
The Fat Wipe
- Use a wad of paper towels to wipe out all rendered fat, browned bits, and residue from the pan. The surface should be clean and dry. A water-based tare in a greasy pan will slide off the chicken instead of adhering. This is the step most American recipes skip.
Make the Glaze (Teri)
- Return the pan to medium-high heat. Pour the tare into the center of the clean pan. It will bubble immediately as the soy sauce hits the hot metal.
- Place the thighs back in the pan with the skin facing up to keep it out of the sauce. Begin spooning the tare over the skin repeatedly.
- Watch the bubbles. Fine small bubbles mean the sauce is boiling but thin, so keep basting and don't rush. Bigger bubbles mean the sauce is thickening, so pick up the basting pace.
- When the bubbles reach 2 to 3 cm across, the sauce has real body. Keep basting until the tare visibly diminishes and coats the chicken like lacquer, then drop the heat to low.
- The chicken is finished when about 1 to 1.5 tablespoons of tare remain in the pan and the skin reflects the light like varnish. The full glazing phase takes 3 to 8 minutes.
Rest and Serve
- Move the chicken to a cutting board and rest for 5 minutes. Slice each thigh on the bias into half-inch pieces. Spoon any remaining tare from the pan over the sliced chicken.
- Serve over short-grain rice with shredded cabbage soaked in ice water (drained and patted dry).